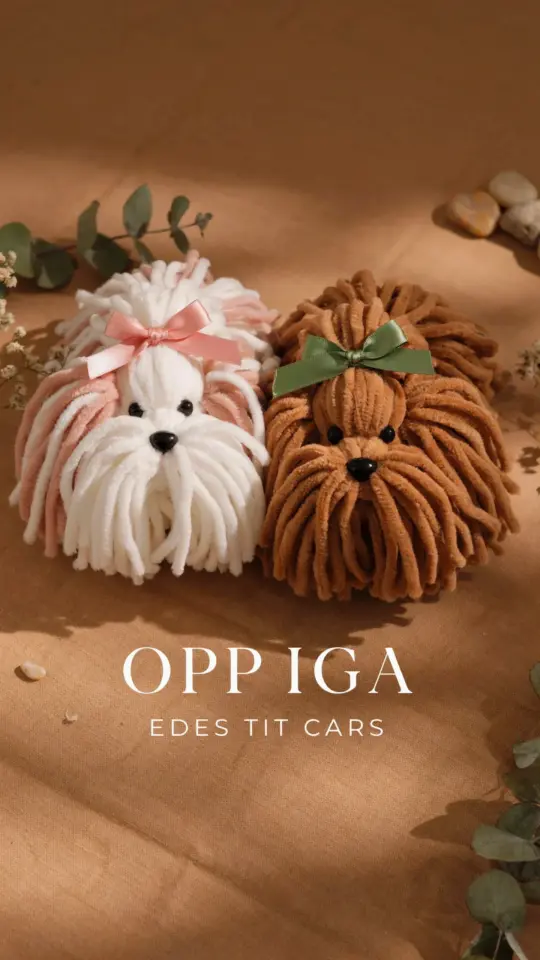
If you are looking for a sweet and simple way to add homemade charm to your tree this year, this YarnDogOrnament is exactly the project you need. It uses basic supplies, takes less than an hour, and even a complete beginner can make a cute little puppy face. I have made several of these with my own kids, and they always end up being the most talked about ornaments when guests visit. Best of all, you can turn it into a thoughtful gift for grandparents or teachers without spending much money.
Simple Supplies for a Yarn Dog Ornament
Before you start, gather everything you need. Most of these items are probably already in your craft drawer. You do not need any special tools or expensive materials.
- Yarn in any color you like. Tan, brown, white, or grey work well for a dog look.
- Cardboard or a small piece of stiff cardstock. A cereal box works perfectly.
- Scissors. A sharp pair makes cutting yarn much easier.
- Hot glue gun and glue sticks (or tacky craft glue for younger kids).
- Small pom‑poms for the nose. A black or brown one about half an inch wide.
- Googly eyes (optional) or tiny black beads. I prefer googly eyes for a playful look.
- A thin ribbon or piece of twine for the hanging loop.
I recommend keeping your work area clutter free. A tray or baking sheet can catch loose yarn bits and make cleanup faster.
Choosing the Right Yarn for Your Christmas Craft
Not all yarn behaves the same way, so it helps to pick one that is easy to handle. For this ChristmasCrafts project, a medium weight acrylic yarn is ideal. It does not stretch too much, and it holds its shape when wrapped tightly. Avoid very fuzzy or fluffy yarns because they make the folds look messy and the face details harder to see.
If you want a more festive look, try a yarn that has a bit of sparkle or a metallic thread woven through it. A red or green yarn can turn your puppy into a holiday themed ornament without changing the steps. I have also used leftover scraps from other projects, and the mix of colors gives each dog a unique personality.
Step by Step: Wrap and Shape the Yarn Body
This is the core of the EasyYarnCrafts technique. You will essentially make a small yarn ball with tails for ears. Start by cutting a piece of cardboard into a rectangle about 3 inches wide and 4 inches tall. Wrap your yarn around the cardboard lengthwise. About 30 to 40 wraps will give you a plump ornament, but you can adjust depending on how thick you want the dog.
Once you finish wrapping, carefully slide the yarn off the cardboard. Keep the loops together and tie a separate piece of yarn tightly around the center of the loop bundle. This creates the shape of a bow tie. Then fold the bundle in half at the tied center so the loops form a round ball. Fluff the loops with your fingers to make it even. This ball becomes the dog’s head.
The two loops on each side of the tie are the beginnings of the ears. Do not cut them yet. Simply separate the loops into two equal groups on the left and right. You will secure them later. The technique is very forgiving, so if your ball looks lopsided, just adjust the loops until it is round.
Adding Details: Ears, Nose, and Eyes for Your DIY Puppy
Now your DIYHolidayDecor starts to look like a real dog. Take the two side loop groups and pinch each one flat. Trim the loops so they are about 1 inch long, then fan them out slightly. Use a little hot glue to attach the ear shape flat against the side of the yarn head. Repeat on the other side. You can leave the ears floppy or stand them up if you glue the base tightly.
For the face, glue a small pom‑pom in the center of the lower half of the head. This is the nose. Place two googly eyes above the nose, about half an inch apart. If you do not have googly eyes, you can glue on small black beads or even draw eyes with
#YarnDogOrnament #ChristmasCrafts #DIYHolidayDecor #EasyYarnCrafts #HandmadeChristmas