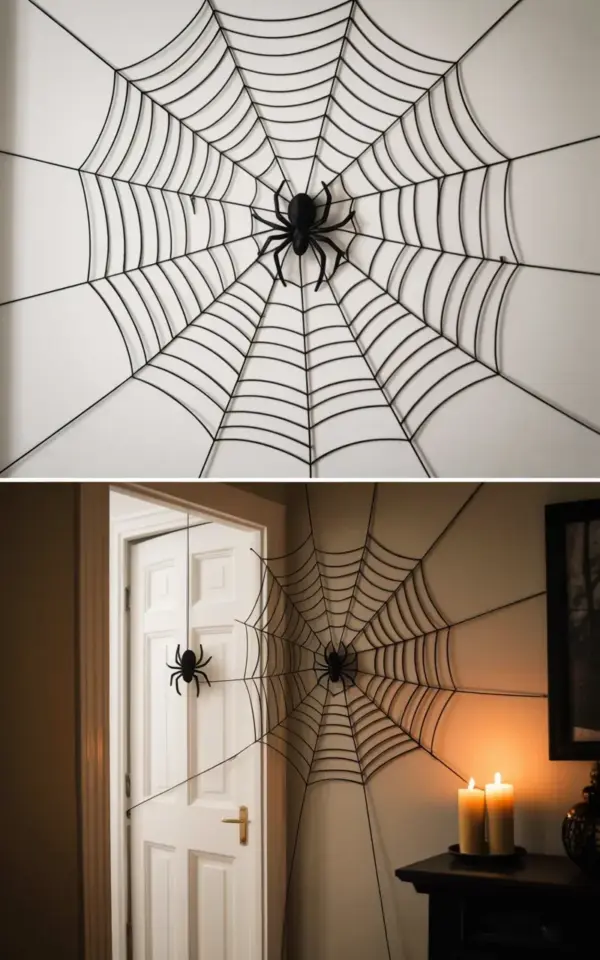
Honestly, I have seen so many Halloween spider web wall decor attempts that look more like a failed fishing net than a haunted hallway. There is a fine line between creepy and messy, and most people accidentally cross it. The good news? That large artificial spider web you see in the photo with its crisp geometric pattern and centered black spider is actually the easiest thing to get right. You just need to avoid the common mistakes that turn a five-minute project into a sticky, lopsided disaster. Let me walk you through the exact pitfalls so your halloweenhome setup looks like the Pinterest dream instead of a tangled regret.
Choosing the Wrong Size Web for Your Wall
Look, size matters here more than you think. Too small and the web looks like a sad doily on an empty white wall. Too big and it overwhelms the space, bunching up at the corners like a giant cotton ball. In the image I am referencing, the web stretches across a hallway with a white paneled door on the left. That proportion is key. The web fills the visual gap above and beside the door without swallowing the door itself.
Here is the rule I follow: measure the width of your wall space and pick a web that covers about two thirds of it. An artificial web that is 6 feet across works beautifully for a standard 8-foot hallway wall. Anything smaller than 4 feet will look undersized. And if you are hanging it above a door? Go narrower. That way the web sits like a crown, not a blanket. Always check the product dimensions before buying because the packaging photo can be very misleading.
Skipping the Geometric Alignment
The web in the top image is not just a random stretch of cotton. Notice those concentric lines radiating from the center? That is a deliberate geometric pattern. Most people pull the web straight out of the package and just throw it at the wall. Then it looks like a spider sneezed. Here is the fix: before you attach anything, spread the web on the floor and find the center point. That center point is where the spider will eventually hang.
Ok so here is a weird thing I learned from a friend who is a theater prop builder. She told me to use painter’s tape to mark a small X on the wall exactly where the center should land. Then you stretch the web outward in even increments. Pull one strand to the top left, one to the top right, one to the bottom. Keep the tension loose enough so the web stays flat but tight enough to show those straight lines. If you skip this, you get a saggy mess. Take the extra 45 seconds to anchor the center first. It makes the whole spookydecor look intentional.
Forgetting the Spider Placement
You bought a fake spider, great. But where do you put it? The image shows a black spider right in the center of the web. That is not a random choice. A spider sitting dead center creates a focal point that pulls the eye in. Off-center spiders look like they fell off and crawled back up. I am not joking. I have seen people put the spider at the edge of the web, and the whole effect reads like the spider is escaping rather than lurking.
Use a small piece of clear thread or fishing line to hang the spider from the wall (or from the web itself) so it dangles slightly forward. That gives depth. And do not use a giant plastic tarantula unless your hallway is already a dark cave. A medium sized spider, roughly 2 to 3 inches across, is enough to read as menacing without looking comical. Center it. Let it dangle. Done.
Using the Wrong Lighting
The bottom image includes a lit candle sitting on a dark surface to the right of the door. That candle is doing half the work. Without that dim side light, the web just looks like a grey net. The shadows cast by a single candle make the web appear deeper and more layered. I have tried battery-operated LED candles and real tea lights. Both work, but here is the catch: the candle needs to be placed at waist height or lower, aimed upward at the wall. That upward light grazes the web and creates the creepy glow.
Do not use overhead ceiling lights. They flatten the web and wash out the shadows. Instead, stick to a single warm-toned candle or a small lamp on a side table. Position it so the light hits the web from an angle. If you have a hallway with cream colored walls like in the photo, that soft warmth really pops. Lighting makes or breaks the whole halloweenideas vibe. Skip it and you lose half the effect.
Overcomplicating the Setup Process
Not gonna lie, I overthought this the first time. I bought spray adhesive. I bought tension rods. I considered a staple gun. None of that is necessary. The web in the photo took five minutes to put up because it uses static cling or tiny clear push pins. Honestly, if you buy a good quality artificial web, it will stick to most painted walls on its own for a few weeks. The cotton fibers grip the paint surface without leaving residue.
Here is a list of things you actually need:
- One large artificial spider web (6 feet diameter, cotton or polyester blend)
- One fake spider (black, medium size, with a small clip or loop for hanging)
- Clear fishing line or thread (optional, but helps center the spider)
- Painter’s tape (for marking the center point on the wall)
- A single candle (battery or real, placed to the side)
That is it. No glue. No double sided tape. You can even reuse the web next year if you pack it flat. Five minutes, seriously. Do not buy a kit with sticky hooks or magnets. They always leave marks.
Ignoring the Surrounding Decor
Look at the photo again. The hallway has a white paneled door on the left, cream walls, and a dark surface to the right holding the candle. That is a clean, neutral backdrop. The web stands out because nothing else competes with it. If you hang the web next to a cluttered wall of family photos or a bright red coat rack, the spooky effect gets lost. Keep the surrounding area minimal.
I once hung a web in a hallway with a big mirror opposite it. Terrible idea. The reflection broke the illusion. Same goes for putting it directly above a shoe rack. The eye will bounce to the shoes, not the web. Clear the space first. Move the mail pile. Take down that motivational poster. Let the web breathe. Your halloweenhome needs negative space to work.
Not Taking It Down Properly (or Leaving It Up Too Long)
This is the one nobody talks about. You put the web up on October 1st, it looks great, then November 1st arrives and you forget about it. Before you know it, the web has collected dust, maybe a real spider has moved in, and it starts looking sad. Remove it within two weeks of Halloween. Why? Because the cotton fibers weaken over time and start shedding little white fuzzies on your baseboards. Also, if the web gets damp from humidity or a leaky hallway, it can stain the paint.
To take it down cleanly, gently pull the fibers away from the wall starting from the outer edges. Work toward the center. Do not yank. If a piece of cotton sticks, use a slightly damp cloth to roll it off. The web will come off in one piece if you are patient. Then fold it loosely and store it in a ziplock bag. I have reused the same web for three Halloweens by doing this. Take it down with care and you will not have to buy a new one next year.
I have also learned that some people leave the web up through Christmas as a twisted joke. Do not be that person. The web belongs to October. Let it rest.
So there you go. A common-mistakes guide that should save you from the tangled frustration I went through my first year. That large geometric web with the centered spider and the single candle on the side? It is genuinely the fastest hallway upgrade you can do. Just avoid the pitfalls I listed, and you will have a spooky hallway that actually looks like the photo, not like a craft project gone wrong. Grab your web, mark your center, light a candle, and see how much difference five minutes makes. Your hallway is waiting.
#halloweendecor #spiderweb #halloweenhome #halloweenideas #spookydecor