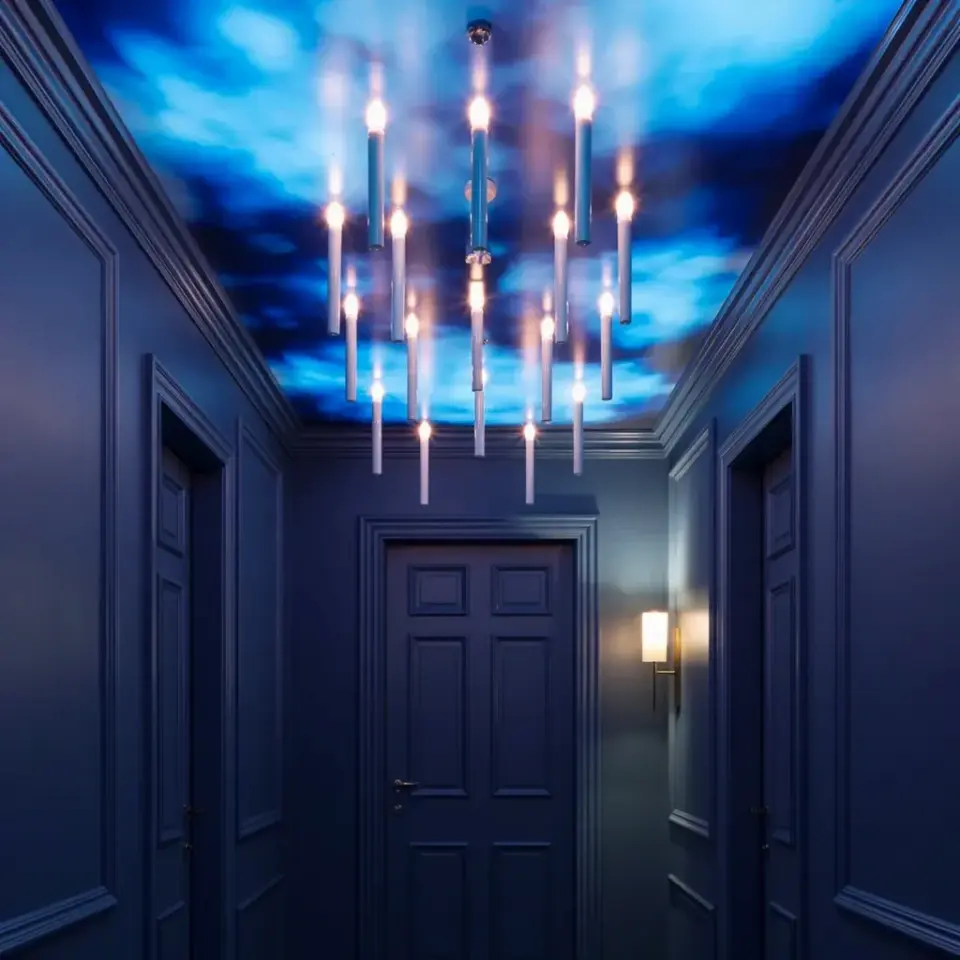
If you have a long, narrow hallway that feels more like a tunnel than a warm welcome, a dramatic hallway on a budget is absolutely doable with a few clever tricks. I recently transformed my own dark corridor into a space that feels like walking through a dreamy night sky. The secret is a painted blue sky ceiling with hanging LED candles that mimic stars, all done without hiring a professional or spending a fortune. The best part? You can pull this off in a weekend with basic supplies and a little patience.
How to Paint a Blue Sky Ceiling for Less Than $50
Start with a clean, primed ceiling. If yours has a textured finish like mine does, that texture actually helps create the wispy cloud effect naturally. You do not need any fancy sponges or stencils. I used a flat latex paint in a soft sky blue, then mixed a small amount of white paint with a little water to make a wash. Using a damp sea sponge, I dabbed white patches in irregular shapes across the ceiling, blending the edges lightly. The key is to work in small sections and step back often to check the balance. For the darker, deeper parts near the walls, I added a tiny bit of navy blue (leftover from the walls) into the sky blue and dabbed that around the edges for a realistic gradient. Total cost for paint and sponge: under $40.
Choosing the Right Navy Blue Paint for Your Hallway Walls
The walls in my hallway are painted a deep navy that feels almost black in low light, but shows a rich blue when the candles or sconce are on. Look for a matte or eggshell finish because it hides imperfections and absorbs light, which makes the ceiling pop more. I went with a shade called “Midnight Voyage” from a budget brand, but any dark navy with a slight gray undertone works. Test a large swatch first and check it at different times of day. Remember, the deeper the navy, the more dramatic the contrast against the white trim and the blue sky ceiling. This is not the time for a pastel navy; go bold.
Making the White Trim and Panel Detailing Work Hard for You
White trim against dark navy walls provides a crisp, architectural line that keeps the hallway from feeling like a cave. I painted all baseboards, door frames, and the simple panel molding (I added a few two-inch strips to the lower half of the walls) in a semi-gloss white. That sheen catches the light from the hanging candles and the sconce, adding subtle sparkle along the edges. If your hallway lacks panel detailing, you can fake it with adhesive MDF strips, or just rely on clean white trim for a similar effect. The contrast is what gives the room its polished, intentional look without needing expensive wainscoting.
DIY Hanging LED Candles: A Simple Starry Night Effect
For the hanging candles, I used a pack of 12 white LED flameless pillar candles with remote controls. Each candle hangs from a clear fishing line attached to a small hook screwed into the ceiling. To make them look like floating stars against the cloudy sky, I varied the lengths from about 6 inches to 18 inches from the ceiling. The trick is to place them in a loose cluster that mirrors a real night sky, not a uniform grid. I used a drill bit slightly smaller than the hook screws to pre-drill small holes, then twisted the hooks in by hand. The fishing line is nearly invisible, so the candles appear to hover. Here is a quick checklist of what you need:
- 12 white LED candles (battery operated, flicker or steady mode)
- Clear fishing line (10-pound test is strong enough)
- Small cup hooks (fine thread, about 1/2 inch)
- Scissors and a tape measure
- A step stool or ladder
Hang the tallest candles at the edges and the shortest near the center to create a sense of depth. The warm white glow against the blue clouds is exactly what makes this budget idea feel so special.
Working with a Textured Ceiling to Create Realistic Clouds
My ceiling has a standard knockdown texture, which means it has subtle peaks and valleys. That texture caught the white paint wash in a way that looks exactly like wisps of clouds. If your ceiling is smooth, you can add a light texture with a roller and a sand-texture additive, or simply use a stippling brush while the paint is wet. For the cloud effect, I used a very dry brush technique: dip a wide brush into the white wash, then wipe most of it off on a paper towel, then lightly drag it across the ceiling in random swirls. Less is more here. You want hints of white, not solid blobs. Stand in the hallway and look up frequently to see where the clouds need more or less density.
Using a Simple Black Door and One Small Sconce to Anchor the Space
The far end of my hallway has a standard four-panel door that I painted black (flat black, not gloss) to match the dark navy walls while still providing a clear focal point. Black doors are surprisingly affordable to DIY if you already have a door, and the color feels intentional and modern. On the right wall, I mounted a single wall sconce with a white fabric shade. That sconce casts a warm ambient light that balances the cool blue of the ceiling. I chose an inexpensive plug-in sconce to avoid electrical work. The light from the sconce reflects off the white trim and the candles, making the whole hallway feel larger and more layered. You really only need one light fixture if the hanging candles provide the starry glow.
Tips for Hanging Candles at Different Heights for Depth
Arranging the hanging candles is the most crucial step for achieving that dramatic, starry effect. Start by marking the ceiling with small pencil dots where you want each candle. I placed about 10 candles total, but you could use more if your hallway is longer. Keep the candles toward the center of the ceiling, staying at least a foot away from the walls so they do not bump into the sconce or door. For a realistic look, avoid symmetry. Place a few low-hanging candles near the middle and some higher ones near the edges. The fishing line lengths I used ranged from 8 inches to 24 inches. Here is a quick visual guide:
- Hang the longest candles (18-24 inches) closer to the walls
- Use medium lengths (10-14 inches) for the middle zone
- The shortest (6-8 inches) should be near the center
- Mix heights even within each zone
When the candles are lit, the varying distances create a parallax effect that makes the ceiling feel deeper and more like an actual night sky. Test the placement by turning off the overhead lights and only using the candles and the sconce. Adjust any candles that look too clustered or too solitary.
That black door at the end of the hallway now frames the entire scene perfectly. The single sconce on the right wall casts a warm glow that contrasts with the cool blue above. And the white trim, clean and crisp, keeps the whole design from feeling heavy. This whole project cost me less than $100, including the paint, candles, hooks, and the sconce. It took one full Saturday to paint and another half day to hang the candles. If you have been wanting a hallway that actually makes you smile when you walk through it, this is your weekend project. Save this idea for later, and when you are ready, grab your fishing line and a roller.
#budgetdecor #hallwaydecor #diyhomedecor #blueskyceiling #dramatichallway