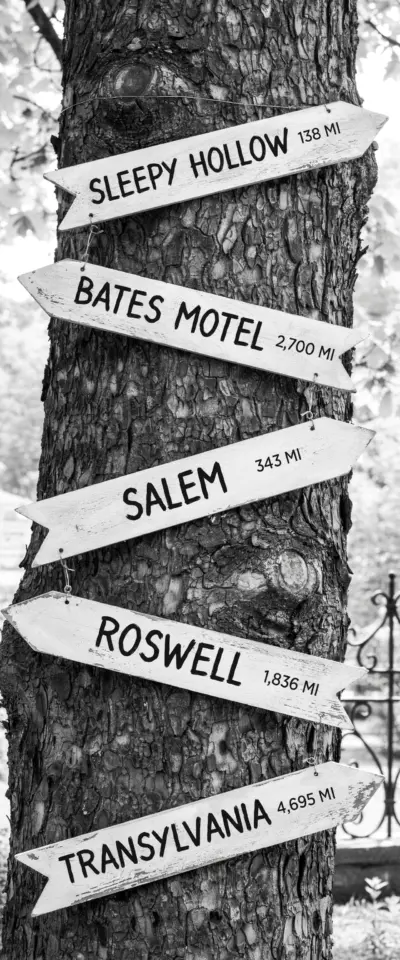
Why Your Homemade Halloween Sign Needs a Strong Identity
Ok so you are building a diy halloween sign post for your front yard, and that is awesome. But here is the one thing that will make it flop: being too generic. Honestly, I have seen dozens of these signs that just say “Graveyard” or “Scary House” with a random arrow. That is boring. Your trick-or-treaters deserve better. They want to feel like they are stepping into a horror movie. So instead of pointing to a generic “Spooky Lane,” point to Elm Street. Or Amityville. Or Frankenstein’s castle. Those are places people actually know. That is the difference between a sign that gets ignored and one that gets photographed.
And look, I get it. You might think no one will notice. But they do. Kids love spotting references. Adults love the nostalgia. A sign that says “Camp Crystal Lake” with a dripping red arrow? Instant hit. So before you pick up that saw or paintbrush, decide on your theme. Be specific. Be weird. Be the neighbor who makes everyone stop and stare.
Choosing the Right Wooden Board for Your DIY Halloween Sign
Not gonna lie, I used a piece of plywood from a broken shelf my first year. It warped after one rainstorm. Here is the thing: your diy halloween sign needs real wood. A nice pine board, about 4 inches wide and 3 feet long, works perfectly. Or grab an old fence plank if you want that weathered look. Thicker is better – at least 1/2 inch thick, or the nails will split it. And please, sand the edges. You do not want a splinter in your finger while you are painting a tiny arrow pointing to “Transylvania.” I learned that the hard way.
One pro tip: hit up a local hardware store for their scrap bin. They often have damaged boards for cheap. You can even ask for pallet wood, but be careful – some pallets are treated with chemicals. Give it a good wash and let it dry in the sun. A little rough texture adds character anyway. That rustic look is huge for spookydecor. So go ahead, embrace the knots and cracks.
How to Paint Directional Arrows That Look Genuinely Creepy
Now for the arrows. You can buy stencils, but honestly, freehand is creepier. A shaky, uneven arrow looks like a ghost drew it in a panic. Use black paint for a classic look, or try a dark red splatter effect – just dip a toothbrush in paint and flick it. Messy is moody. I like to add a little dry brush texture, dragging a barely loaded brush across the wood to mimic age. For the text, keep it simple. “Elm Street 1 mile,” “Transylvania 2 miles.” The font should look slightly distressed, like an old road sign from a horror flick.
Here is a trick I stole from a haunted house pro: use a candle. Rub a candle along the wood before painting. Then paint over it, and after it dries, scrape a little off with a coin. The paint chips away in places, revealing the raw wood underneath. Instant weather-worn spookiness. Your halloweensign will look like it has been standing there since 1958. That is the vibe.
Iconic Horror Locations That Make Your Sign Pop
So what should you write on your arrows? Do not just pick any random scary name. Choose locations that people actually recognize. Here is my shortlist of guaranteed crowd-pleasers:
- Elm Street – the classic nightmare fuel. Everyone knows Freddy’s street.
- Amityville – that house with the creepy eyes. Short and punchy.
- Crystal Lake – Jason Voorhees territory. Bonus points if you add a tiny machete icon.
- Camp Green Lake – wait no, that is from a kids movie. Scratch that. Stick with horror. Camp Crystal Lake is the one.
- Transylvania – not a single location, but Dracula’s castle is iconic. Or go specific: “Castle Dracula.”
- Psycho House – the Bates Motel. Add a little motel sign shape if you are ambitious.
My personal favorite – add a local inside joke. I once made an arrow pointing to “The Shed Where We Keep the Christmas Decorations.” It got more laughs than the scary ones. But keep the majority horror-themed. That is what sells the diy halloween vibe. Mix serious with silly if you want. Your yard, your rules.
Weatherproofing Your Homemade Halloween Sign Post (Yes, It Matters)
Here is the mistake I made twice: not sealing the wood. Rain turns painted wood into a soggy mess within hours. And then your beautiful arrow to “Frankenstein’s Castle” just runs down the board in black streaks. Not spooky, just sad. Use a clear outdoor sealer. Spray it on after the paint is dry. Or brush on a coat of polyurethane. It adds a slight sheen that looks intentional, like a car headlight reflecting off a wet road. Creepy and practical.
If you want to go full survival mode, attach a small piece of flashing or a plastic roof over the top edge of the sign. That way rain drips off the back instead of soaking into the wood grain. I used a piece of an old gutter. Worked like a charm. Your homemadedecor will survive October storms and still look good for next Halloween. Store it in a dry garage after the season – but the sealer buys you time.
Hanging Your Sign Post on a Tree – The Right Way
So you built your sign post. Now where do you put it? The Pinterest description says hang it on a tree for that perfect roadside look. Yes. But do not just hammer a nail into the tree trunk. That is lazy. Use twine or rope, something thick and jute. Wrap it around the trunk and attach the sign to the rope. This way the bark stays unharmed, and the sign can swing a little in the wind. That movement catches the eye. Plus it looks like it has been there forever.
Pick a tree near the sidewalk, not hidden behind bushes. You want people walking by to see it from a distance. If you do not have a good tree, a fence post or a tall wooden stake driven into the ground works too. Paint the stake black so it blends into the night. And for extra drama, point a cheap solar light up at the sign from below. Shadows on the wood, man. Instant creepiness. You can also hang multiple signs on different trees to create a trail. “Toxic Waste Dump this way.” “Abandoned Mine shaft that way.” Build a whole story.
Adding Final Creepy Touches That Make People Look Twice
I always add one weird detail that has no business being there. A tiny plastic spider glued to the corner of the sign. Or a fake rust stain using brown acrylic paint dabbed with a sponge. Once I hung a strand of fake ivy that draped over the top letter. It looked overgrown, like nature was reclaiming the warning. That little extra effort took maybe two minutes but made the sign look 10 times more authentic. Do not overdo it – one or two details is enough. A bunch of clutter looks messy, not spooky.
And here is the thing: people will take photos with your sign. Kids will point and laugh. Neighbors will ask where you bought it. That is the win. You built a spookydecor piece that feels personal, not store-bought. It becomes a little landmark on your street. A conversation starter. Honestly, that is better than any store decoration could ever be.
One Last Thought Before You Start
So stop overthinking it. Pick your horror locations, grab a board, and paint those arrows. The most important step is just starting. Do not worry about perfection. A crooked nail, a smudged letter, a splintered edge – those are all features. They make the sign feel real, like something a frantic traveler would slap together in the dark. And that is exactly the feeling you want on Halloween night. Now go make something creepy. And pin this for later – you will thank me next fall. 🎃
#halloweendecorations #diyhalloween #halloweensign #spookydecor #homemadedecor