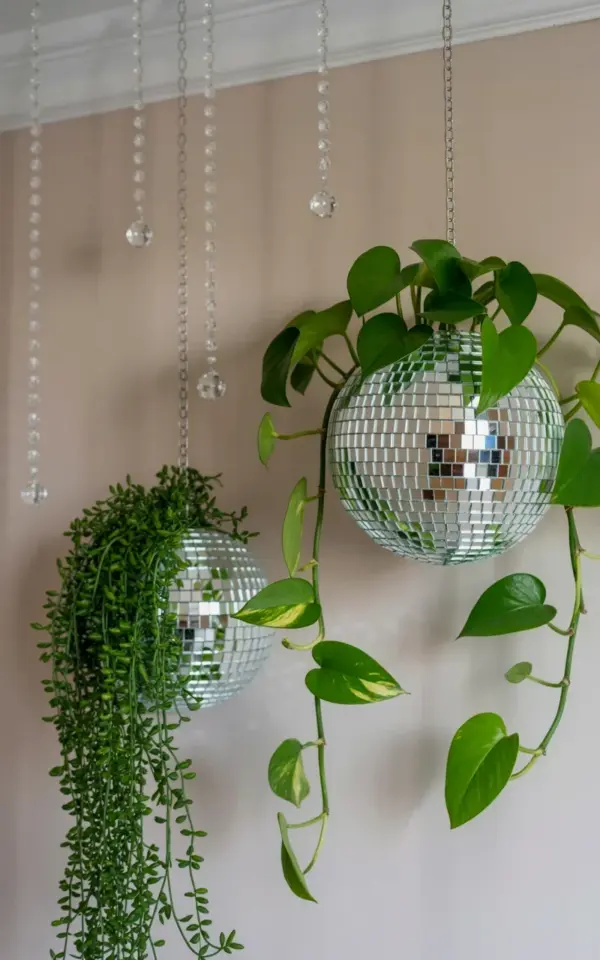
If you have been scrolling for a fresh way to add greenery and a little shimmer to your walls without spending a fortune, these disco ball planters might be exactly what you need. These discoBallPlanters combine the reflective charm of mirrored tiles with the easy care of pothos, making them an ideal weekend project. In the photo that inspired this guide, two disco balls sit mounted on a pale wall: the left one holds a cascading pothos with small oval leaves, the right one a pothos with larger, heart-shaped leaves. A row of clear crystal beads dangles from the ceiling, catching light and adding a soft sparkle. This post walks you through the exact steps to recreate that look on a tight budget.
Why Disco Ball Planters Work for Budget Wall Decor
Traditional planters can cost a surprising amount, especially if you want something decorative. A disco ball planter made from a mirrored globe costs a fraction of a designer ceramic pot. You can find small disco ball ornaments at dollar stores or thrift shops, and the pothos cuttings can come from a friend or a single nursery plant that you propagate yourself. The effect is still polished and playful. The mirrored facets reflect light and the surrounding decor, which makes the wall feel larger and brighter. For anyone working with a limited budget, this project delivers a high visual return for a very low investment.
Materials You Need for a Pothos Wall Decor DIY
To build your own disco ball planters, gather these items. Most of them are inexpensive or already lying around your home.
- Two disco balls (hollow, with removable top halves, roughly 6 to 8 inches in diameter). Thrift stores often have them for under $5 each.
- Two small plastic pots (2 to 3 inches wide). These will fit inside the disco ball cavity.
- Pothos cuttings (one variety with smaller leaves like ‘Marble Queen’ or ‘Golden Pothos’, and another with larger heart-shaped leaves like ‘Neon’ or ‘Jade’).
- Potting mix (a standard houseplant soil works fine).
- Clear fishing line or thin silver wire for hanging the disco balls.
- Clear crystal beads (small, round, drilled beads on a string, available at craft stores).
- Scissors and a drill or a strong hot glue gun (to attach the hanging hardware if needed).
Step-by-Step: Turning a Disco Ball into a Planter
Start by separating the top half of the disco ball from the bottom. Most cheap disco balls have a screw or a plastic hinge. If yours is a solid round ball, you can carefully cut a hole at the top large enough to insert a pot. I prefer the two-piece style because it makes planting much easier. Once you have the halves apart, place your small plastic pot inside the bottom half. The rim of the pot should sit flush with the opening. If the pot is too tall, trim the sides down with utility scissors. Fill the pot with soil and add your pothos cutting, making sure the roots are covered and the stem is secure. Then snap or glue the top half back into place so the pot is hidden and only the plant emerges from the opening.
For the hanging mechanism, drill a small hole in the very top of the disco ball’s cap, or use a dab of strong glue to attach a small metal loop. Thread your fishing line through the loop and tie a secure knot. The line will be nearly invisible, which makes the disco ball appear to float against the wall. Hang them at different heights for a more dynamic look. In the photo, the left ball hangs slightly higher than the right one, and that asymmetry is part of the charm.
Choosing the Right Pothos for Each Disco Ball
The photo shows two distinct leaf shapes: small, oval leaves on the left and larger, heart-shaped leaves on the right. This contrast adds texture and keeps the display from looking uniform. For the left disco ball, pick a pothos variety that stays compact and produces smaller leaves. ‘Pearls and Jade’ or ‘Marble Queen’ are excellent choices because their smaller leaves also have beautiful variegation. For the right ball, go with ‘Neon’ pothos or a standard ‘Golden’ pothos; these tend to grow larger leaves when given good light. Both types cascade nicely, but the leaf size difference creates a more curated, intentional feel.
To get the cascading effect seen in the backdrop, let the vines trail at least 12 to 18 inches before you hang the planter. You can train the stems to grow by gently guiding them outward over the ball’s surface. The glossy leaves will catch the light from the mirrored tiles, making the whole display sparkle.
Adding Crystal Beads for a No-Splurge Shimmer
The crystal beads in the photo are a simple trick to extend the sparkle without buying expensive chandeliers or garlands. You can buy a strand of small clear beads for a few dollars at any craft store. Cut the strand to the desired length (about 3 to 4 feet works well). Attach one end to the ceiling with a small clear command hook or a pushpin. Let the beads drape naturally across the wall, passing in front of or behind the disco balls. You can also wrap the beads loosely around the fishing line of one of the planters to create a connecting line. This adds movement and a soft, subtle shimmer that photographs beautifully and feels festive for holiday decor, yet subtle enough to keep up all year.
Caring for Your Pothos in a Wall Planter
Pothos is one of the most forgiving houseplants, which makes it perfect for a wall project where you cannot easily water the soil from the top. I recommend using a small watering can with a narrow spout, or simply taking the disco ball planter down once a week. Water only when the top inch of soil feels dry. Because the pot inside the disco ball is small, the soil dries out fairly quickly. This actually helps prevent root rot. Place the wall in a spot that receives bright, indirect light. Direct sun can scorch the leaves and fade the mirrored surface. If your room is on the dim side, pothos will still survive but the leaves may become more spaced out. Rotate the planter occasionally so the vines grow evenly around the ball.
Budget Holiday Decor or Year-Round Wall Accent
These disco ball planters work for both seasonal and everyday use. During the holidays, the mirrored facets and crystal beads catch twinkle lights and create a festive glow. After the holidays, you can remove the beads or swap them for a different color (muted golds or frosted whites look lovely in winter). In spring and summer, the green leaves and reflective surfaces feel fresh and light. The total cost for two planters, two pothos cuttings, a bag of soil, and a strand of beads usually comes to less than $20. That is a fraction of what a single designer planter would cost. Plus, you get the satisfaction of building something yourself that looks custom.
If you decide to make more than two, consider varying the sizes of the disco balls. A small one (4 inches) with a single trailing vine next to a larger one (8 inches) with a fuller plant creates a playful scale shift. The same technique works for other trailing plants like string of pearls or philodendron, but pothos is the most resilient for beginners.
Conclusion
I hope this guide gives you the confidence to try a project that feels both special and affordable. A pair of disco ball planters with pothos vines and a few crystal beads can transform a plain wall into a conversation piece. The best part is that you can adapt the colors and bead styles to match any room. If you end up making your own version, I would love to hear how it turned out. Share a photo or leave a comment below. Happy planting, and enjoy the sparkle.
#discoBallPlanters #budgetDecor #pothosPlant #wallDecorIdeas #holidayDecor