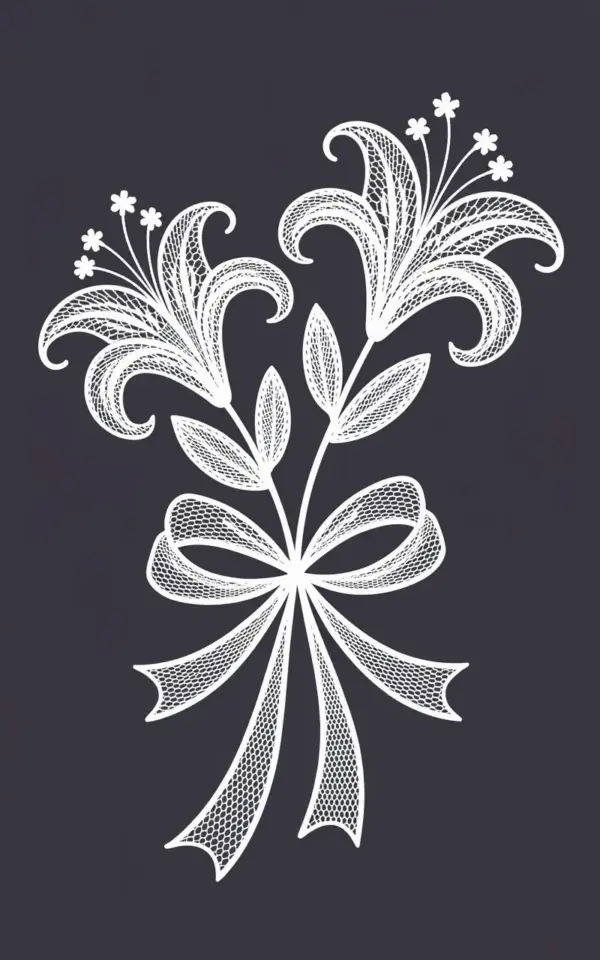
Look, I’m not gonna lie. I have a soft spot for any embroidery pattern that looks complicated but actually isn’t. This dainty lily laceembroidery pattern on dark gray fabric is exactly that. It caught my eye because honestly, white thread on a deep charcoal background just hits different. It’s moody without being heavy. It’s delicate without being fussy. And the best part? You can stitch this over a weekend. Maybe even a lazy Sunday afternoon if you really get into the flow.
The photo shows two symmetrical lily flowers at the top, their petals filled with intricate open stitching that creates this gorgeous see-through lace effect. A small decorative bow anchors the base, and those flowing ribbons beneath curl with just the right amount of grace. Against that dark fabric, every single stitch pops. It’s the kind of project that makes people lean in closer and say wait, you made that?
What You Will Need for This Lily Embroidery Pattern on Dark Fabric
Let’s talk supplies first because fabric choice actually matters here. A dark gray background is non-negotiable if you want that high-contrast lace look. I used a medium-weight linen blend in charcoal, but a good quality cotton broadcloth works too. Just avoid anything too stretchy or loosely woven because your lace stitches need a stable foundation.
For thread, grab a fine white cotton or linen thread. Nothing too thick. You want the stitches to feel airy, not clunky. And for needles, a size 8 or 9 crewel needle is your friend. It slips through the fabric without leaving visible holes. Here’s what else I had on my desk:
- Embroidery hoop (I prefer a 6-inch bamboo hoop for this size design)
- Water-soluble fabric marker or white chalk pencil for tracing
- Small sharp scissors for snipping thread close to the fabric
- A bright desk lamp because white thread on dark fabric will test your eyes
- Patience. Not gonna sugarcoat that part. The lace effect takes focus.
One weird thing I always do? I organize my floss by color shade rather than number. It drives my embroidery friends absolutely crazy, but honestly, it works for my brain. Do what works for yours.
Tracing the Symmetrical Design onto Dark Gray Fabric
Ok so here’s the thing about tracing a detailed lace embroiderypattern onto dark fabric. You cannot just wing it with a regular pencil. I learned this the hard way. Use a white water-soluble marker or a white chalk pencil. Light colors show up beautifully against charcoal gray, and you can wash the marks out afterward.
Start by folding your fabric in half and lightly creasing the center line. This helps you place your design symmetrically, which matters for this pattern. The lily flowers sit at the top, balanced on either side, with the bow and ribbons centered below. If your tracing is slightly crooked, the whole piece will feel off. Trust me on this. I had to restart once because my left lily was sitting a full quarter inch higher than the right, and it haunted me.
Take your time with the transfer. The petals have these little interior details that define the lace look. You want every tiny loop and curve marked clearly. I traced mine on a sunny afternoon by a window because good natural light makes a real difference when you are working with dark fabric and light marks.
Stitching the Delicate Petals and Building the Lace Effect
Here is where the magic happens. Those lily petals look airy and delicate because of the open stitching inside them. You are not filling the whole shape solidly. Instead, you create a network of stitches that mimics lace. Think chain stitch for the outer outlines, then buttonhole stitch or detached chain for the interior spaces.
Start with the outline of each petal. Use a fine backstitch or a stem stitch in one strand of your white thread. Keep your tension even but not tight. You want the thread to sit nicely on top of the fabric, not pull it into puckers. Then move to the internal decorative areas. Some petals have small loops radiating inward. Others have tiny straight stitches that fan out like veins.
For the see-through lace effect, leave gaps. Seriously. Do not stitch every single millimeter. Part of what makes lace read as lace is the negative space around your stitches. Let the dark fabric show through in calculated places. That contrast between dense stitching and bare fabric is the whole point. It creates depth and that ethereal quality we love.
Adding the Bow at the Base and Those Flowing Ribbons
The bow is honestly my favorite part. It sits right at the center base of the flowers, tying the two stems together visually. Use a satin stitch for the bow loops. This gives them a smooth, slightly shiny finish that contrasts nicely with the airy lacework of the petals above. Work the stitches close together, but keep them neat and parallel.
Those flowing ribbons beneath the bow deserve attention too. They curl and twist downward, and each ribbon has an inner and outer edge. Stitch the outer edge first with a simple outline stitch, then fill the ribbon body with detached chain stitches or a satin stitch if you want a fuller look. I prefer detached chain here because it echoes the lace feel of the lilies and keeps the whole design visually cohesive.
But here is a practical tip nobody told me when I started. When you stitch ribbons that curl, pay attention to the curves. Shorter stitches on the inside curve, longer on the outside. It prevents that puckered, strained look that ruins the flow. And vary your stitch length slightly. It makes the ribbons feel organic rather than mechanical.
Creating Contrast and Dimension with White Thread on Dark Gray
This particular handembroidery project teaches you something about contrast. White thread on dark gray is naturally high contrast, but you can push it further by using different stitch textures. A smooth satin stitch catches light differently than a raised chain stitch. Mix them up. It keeps the eye moving across the design.
For the little floral embellishments scattered between the main lilies, use tiny French knots or seed stitches. They add sparkle. Well, not literal sparkle, but they add visual interest. Little dots of texture that break up the larger shapes. I put a few extra French knots near the base of my bow and honestly, it made the whole piece feel more finished.
One thing I will warn you about. White thread gets dirty fast. Especially when you are handling a dark fabric and your hands are naturally oily. Wash your hands before you start stitching. Keep a clean cloth nearby to wipe your needle. Yes I know this sounds like basic advice, but I have ruined too many white threads by being lazy about hand cleanliness. Do not be me.
Finishing and Framing Your Dainty Lily Lace Embroidery
When you are done stitching, remove any water-soluble marker marks by lightly dabbing with a damp cloth. Let the piece air dry completely before you take it out of the hoop. Trust me on this. Wet fabric plus hoop tension equals stretched distortion that does not always bounce back.
For framing, consider a hoop mount or a simple square frame. The dark fabric with white lacework looks stunning in a floating frame where the edges are visible. Or leave it in your embroidery hoop, trim the back neatly, and hang it as is. That casual hoop-on-the-wall look is still popular and honestly, it suits the delicate aesthetic of this pattern.
If you want to gift this, pair it with a handwritten note explaining the stitches you used. People love knowing the process behind handmade things. It adds a layer of meaning that a bought item can never replicate.
Why This Pattern Works for a Seasonal Weekend Project
Not gonna lie, summer is prime time for this type of stitching. The days are longer, the natural light is better, and there is something about warm weather that makes white lace designs feel fresh and appropriate. But honestly, this also works beautifully for late winter when you are craving spring. Lily motifs have that transitional energy.
The dark gray background is interesting too because it is not black. It is softer. More forgiving. It gives the white thread room to glow without screaming for attention. Pair this with a light linen dress or hang it in a room with neutral tones. It fits a current trend toward moody, romantic interiors, the kind of space where nothing matches perfectly but everything feels intentional.
I finished mine in about 8 hours spread across two afternoons. That included some unpicking and a minor crisis when my needle snapped. So budget yourself a full weekend if you are newer to lace embroidery. It is not a race. The slow stitching is part of the joy anyway.
Final Thoughts on This Lace Embroidery Pattern
This dainty lily design is one of those projects that looks like you spent weeks on it. But you won’t. And that is the secret. The lace effect reads as complicated because of the open spaces and the fine thread work, but the techniques are really just basic stitches applied with intention. Outline. Fill. Leave gaps. Create texture. That is basically the whole recipe.
If you stitch this on dark gray fabric with white thread, you will have something genuinely special. A conversation piece for your wall. A handmade gift that feels personal without being overwhelming. A small act of creativity that fits into a weekend.
Save this pattern for your next stitching session or start it this weekend. Your future self will thank you. And honestly, we could all use more beautiful handmade things in our lives right now.
#laceembroidery #embroiderypattern #lilyembroidery #handembroidery #diyembroidery