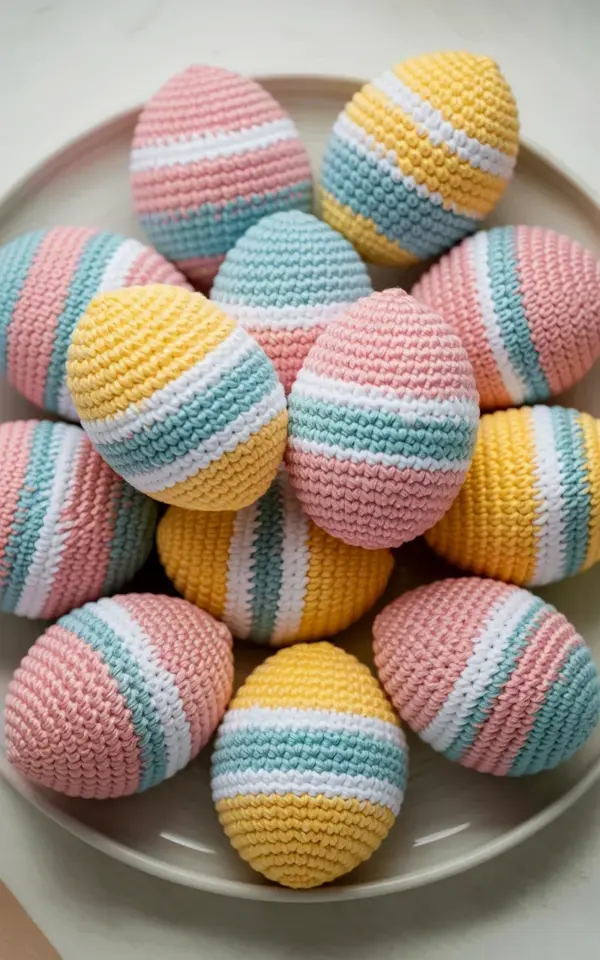
I’ll be honest, I never thought I’d be the kind of person who crochets a basket of fake eggs for spring. But here we are, and honestly, I’m obsessed with these crochet Easter eggs in pastel stripes. Look, I tried dyeing real eggs one year. It was a disaster. Smelly vinegar everywhere, a few cracked shells, and my kitchen counter looked like a tie-dye experiment gone wrong. So when I discovered you can make cute little fabric eggs that never rot and never need refrigeration, I was sold. The photo I’m working from shows a handful of them piled on a white ceramic plate. They’re striped in pink, yellow, light blue, and white, with a glossy finish that catches the light. Some are rounder, some are more pointed like real eggs. They cast little shadows where they overlap. It’s exactly the kind of thing you want for a spring brunch table or just sitting on a shelf to remind you the seasons are changing.
If you’ve never crocheted before and the idea of making a three-dimensional egg shape sounds intimidating, I get it. I really do. But these little guys are way simpler than they look. And they work up fast. You don’t need years of experience or a ton of fancy supplies. Just some yarn, a hook, and a little patience. Let me walk you through it step by step, assuming you know absolutely nothing about crochet. Zero. Nada. That’s ok. I started there too.
Why Crochet Easter Eggs Work So Well for Spring Table Decor
Here’s the thing about storebought Easter decorations: they’re either plastic and cheap-looking or they’re expensive and fragile. Crochet eggs hit a sweet spot. They have a handmade charm that plastic bunnies can’t touch, and they’re durable enough to toss in a bowl or let kids play with. You can drop one on the floor. No cracks. No tears. (My cat once tried to steal a yarn egg I was making. She batted it around the living room for ten minutes. The egg was fine. The cat was confused.)
Plus, the pastel spring decor trend leans heavily on soft colors and texture. That’s where these eggs shine. The striped pattern in pink, yellow, light blue, and white adds a gentle pop of color without screaming “holiday explosion.” You can leave them out all spring, not just Easter weekend. Change the plate, change the arrangement, and they still look fresh. And because they’re handmade, every single egg has its own little personality. One might be a bit lopsided. Another might have a slightly tighter stitch. That’s part of the appeal. Perfection is boring anyway.
What You Need to Get Started (Handmade Home Decor on a Budget)
If you’re aiming for handmade home decor that doesn’t cost a fortune, crochet is your friend. For these eggs, the supply list is short. You’ll need:
- Yarn in pastel colors. I used a worsted weight acrylic. It’s cheap, it’s easy to work with, and it holds its shape. Cotton works too, but it’s a little stiffer. Wool is nice but pricier. Honestly, for a first try, go with whatever is on sale.
- A crochet hook. Size G or H (4.0 or 5.0 mm) is good for worsted weight yarn. If you use thicker yarn, go bigger. Thinner yarn, smaller hook. Don’t overthink this part.
- Stuffing. Polyester fiberfill is standard. You can also use scrap yarn scraps if you’re cheap like me. I sometimes save leftover bits from other projects and shove them inside. Nobody knows but me.
- A yarn needle. For weaving in ends and sewing the egg shut. A big blunt one is fine.
- Scissors. Obviously. But use ones that are actually sharp, not the sad kitchen scissors that barely cut paper.
That’s it. No special gadgets. No patterns to buy. You can find a million free patterns online, but I’ll explain the basic idea below so you understand what’s happening.
Choosing Your Pastel Yarn Colors for Spring Craft Ideas
Ok so, color combos. The photo uses pink, yellow, light blue, and white. That’s a classic spring palette. But you can swap in lavender, mint green, peach, or even a soft coral. The key is to keep the saturation low. You want colors that look like they’ve been washed in a gentle cloud, not neon brights. Pastels work because they feel soft and airy. They also photograph beautifully, which matters if you’re posting on Pinterest. (Pro tip: lay your eggs on a white plate or a linen napkin. The contrast makes the colors pop.)
I like to mix two or three pastels with one white stripe. The white gives the eye a place to rest. Without it, the stripes can blur together. You can do all-over stripes, like a candy cane effect, or you can do a solid color egg with one or two accent stripes. Personally, I think the allover striped look is the cutest. But I’m biased because that’s what the photo shows, and I am a slave to the photo.
One weird specific detail: I once tried to use a mint green that was almost gray. Looked great on the skein. Stitched up, it looked like a moldy egg. So, yeah, hold your yarn up to something white before you buy. Check the undertone. If it looks sickly, skip it.
The Basic Crochet Stitches You Need for Egg Shapes
If you’ve never crocheted a sphere before, the idea of making a 3D egg might sound scary. But honestly, it’s just a tube that you close at both ends. You start with a magic ring (or chain a few and join it, but magic ring is better for a tight start). Then you work in continuous rounds, increasing stitches to make it widen, then working even for a while, then decreasing to close it up. That’s it. The shape is determined by how fast you increase and how many rounds you work even.
For a rounder, more spherical egg, you increase quickly (like 6 increases every other round for a few rounds), then work even for several rounds, then decrease quickly. For an elongated egg shape, you increase a little, then even for more rounds, then a slow decrease. It’s all about ratios. The first few eggs I made looked like potatoes. I didn’t care. Potatoes are cute too. But if you want a real egg shape, follow a pattern. There’s a reason people write them down.
I won’t give you a full pattern here because that would be a whole other article. But I’ll tell you the stitch: single crochet. That’s it. One stitch. Over and over. You don’t need double crochet or treble crochet for these eggs. Single crochet gives you a tight, smooth fabric that holds stuffing well and looks neat.
How to Shape Your Crochet Eggs (Spherical vs Elongated)
So you’re working in the round, and you want that egg silhouette. Here’s the practical part. When you increase, you put two stitches into one stitch. That makes the circle wider. When you decrease, you work two stitches together, which narrows it. The number of stitches in a round determines the circumference. A typical small egg might start with 6 stitches in the magic ring, increase to 12, then 18, 24, maybe 30. Then you work even for 10 or 12 rounds. Then you decrease back down to 6 and close it. That gives you a sphere.
For the elongated eggs in the photo, you want to stretch the even section. Instead of 10 rounds even, make it 14 or 16. That extra length makes it pointier at the ends. Also, make the decreasing rounds slower. Instead of decreasing every round, alternate a decrease round with a plain round. That creates a gentler taper. The eggs in the photo vary in size. Some are clearly bigger and rounder. Some are long and narrow. I think that mix is intentional. It looks more natural, like a real nest of eggs where every one is slightly different.
When you stuff them, don’t overstuff. You want them firm but not rock hard. Overstuffed eggs look lumpy and the stitches stretch out. Understuffed eggs feel floppy and sad. Aim for a slight squish. You should be able to press a finger into the surface and feel resistance but not concrete.
Adding a Glossy Finish to Your Crochet Eggs
Here’s the part that really makes these eggs pop in the photo. That glossy shine. How do you get it? Two ways. One easy, one a bit extra. The easy way: use a yarn with a slight sheen. Acrylic yarn often has a natural gloss. Some brands are shinier than others. Look for “worsted weight acrylic” that feels smooth, not fuzzy. Red Heart Super Saver is not the one for this. It’s matte and scratchy. Try Caron Simply Soft or a similar “soft” acrylic. That stuff has a subtle shimmer. It’s still cheap and easy to wash.
The extra way: after your egg is finished, spray it lightly with a fabric stiffener or a diluted glue solution. That gives a glossy, almost plastic-like finish. But be careful. Too much and it gets crunchy. I tried it once with a mixture of water and white glue. It worked ok but the egg felt weird in my hand. Honestly, the yarn sheen is enough. The photo might have a filter or a good light source that makes the eggs look extra shiny. Real life doesn’t need to be that glossy. But if you’re going for that fake ceramic look, the stiffener is your friend. Test on a scrap first.
Arranging Your Crochet Eggs on a Plate for That Perfect Centerpiece
Alright, you’ve made a pile of eggs. Now what? The photo shows them on a white ceramic plate, casual and overlapping. That’s a solid move. White plate, white background, pastel eggs. Minimal effort, maximum impact. But you can change it up. Put them in a glass bowl. Nestle them in a bed of moss or green grass from the craft store. Tuck them into a little wire basket. Honestly, they look good on almost anything. Just avoid bright patterns underneath. The eggs are already busy with stripes. Let them breathe.
Another idea: use a tiered cake stand. Put a few eggs on each level. That makes a statement for a brunch table. Or scatter them individually along a table runner. Small clusters. Not everything has to be in one pile. I like to put one egg at each place setting as a tiny take-home favor for guests. But then I have to make a dozen eggs, which takes time. Worth it though.
One thing I learned the hard way: if you use a plate with a rim, the eggs might roll off. Eggs are round. They roll. A shallow bowl or a plate with a slight lip works better. Or just pile them up close together so they support each other. That overlapping look in the photo is practical, not just aesthetic. Less rolling, more nesting.
So anyway. That’s the whole deal. Crochet Easter eggs are fun, fast, and forgiving. Even your first lumpy one will be cute. Even your accidentally-too-big one will work. Don’t stress. Just make them, put them on a plate, and enjoy that spring feeling without any vinegar smell.
If you try these, I’d love to know how they turn out. Drop a comment or tag me on Pinterest. I’m always looking for new color combos to steal. (I mean, get inspired by.) Happy hooking.
#crocheteastereggs #pastelspringdecor #handmadehomedecor #eastertabledecor #springcraftideas