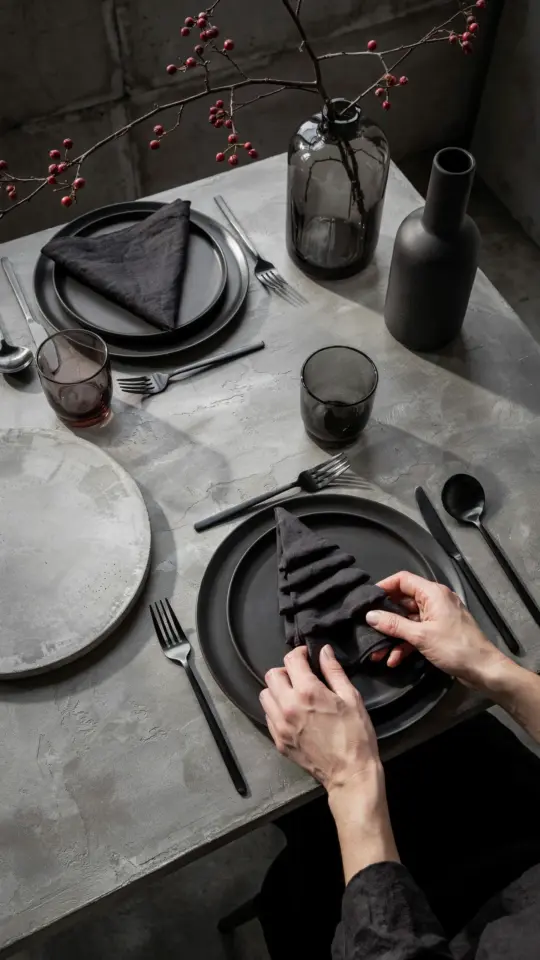
If you have never folded a napkin into something other than a rectangle, do not worry. This Christmas napkin folding tree is the perfect place to start. I learned it myself last year after watching a quick video, and I was surprised how simple it actually is. The trick is to choose the right napkin and follow a few clear folds. By the end of this post, you will be able to turn plain cloth or paper napkins into a little evergreen tree that sits on each plate. Your guests will think you spent hours on it, but really you will need maybe two minutes per napkin. Let me walk you through it from the very beginning.
What You Need for a Napkin Folding Tree
The good news is you probably already have everything. For this Christmas napkin folding tree you need only two things: a square napkin and a flat surface. That is it. No pins, no tape, no starch. I prefer cloth napkins because they hold their shape better, but stiff paper napkins work too. If you use paper, pick a thicker brand or even a paper cocktail napkin that is unfolded into a square. For cloth, look for 100% cotton or a cotton poly blend that presses crisp. Ironing your napkin first makes a huge difference. A wrinkled napkin will look sloppy. Take the extra minute to press it flat.
- One square napkin (18 to 20 inches works best for a dinner plate)
- An iron (optional but recommended)
- Your hands and a clean table
That is the whole supply list. If you want to add a star on top, you can cut a small star from cardstock or use a toothpick with a paper flag. But the basic tree does not need any decoration.
Step by Step: How to Fold a Christmas Tree Napkin
I will describe the steps as if you have never folded anything beyond laundry. Lay your napkin flat on the table with the points facing up, down, left and right (like a diamond). Fold the bottom point up to meet the top point, creating a triangle. The crease should run from left to right. Now take the left point of that triangle and fold it up to the top point. Do the same with the right point. You will have a small square shape with a flap in the middle. Flip the whole thing over. Fold the top layer down about an inch or two, depending on the size of your napkin. That little flap becomes the base of your tree. Flip it back over. You now have a layered diamond shape. Gently pull the layers apart from the bottom to create the tree silhouette. It sounds complicated, but once you do it, the movements make perfect sense. I promise the first one takes a minute, and after that you will fold ten in under five minutes.
For a visual learner, I recommend searching for a quick video after reading these steps. But if you follow the steps slowly, the shape will appear. The key is to make crisp creases. Use the edge of your hand or a ruler to press each fold.
Choosing the Right Napkins for Your Holiday Tablescape
Not every napkin folds the same way. For a tablescape that looks elegant without overdoing it, choose solid green or red napkins. A classic dark green mimics a real pine tree. I once used white napkins with a green edge, and the tree looked like it had snow on the tips. That was a happy accident. Avoid napkins that are too small, anything under 16 inches square will give you a stubby tree. Also avoid super slippery fabric like satin, it will unfold on its own. Cotton or linen is best. Paper napkins can work, but they tear easily if you fold them too hard. Try a few with leftover napkins before the big dinner so you know how they behave. If you are serving a multicourse meal, you might want to place the napkin tree on the plate as a decorative element that guests can unravel.
How Many Napkin Trees Do You Need for Your Table
That depends on your seating plan. A typical holiday dinner for six means six napkin trees. But I also like to put one extra in the center of the table as a mini centerpiece. Place it on a small wooden slice or a cloth napkin ring. For a buffet, you can fold napkin trees and line them along the serving table. Each one acts as a place card if you tuck a name tag into the top fold. For a large gathering of twelve or more, I recommend folding them ahead of time and stacking them on a tray. Then right before guests sit down, put one on each plate. It takes maybe ten minutes total for a dozen. That is faster than arranging flowers and much cheaper.
Creative Variations on the Napkin Tree Centerpiece
The basic fold is just the beginning. Once you master it, try a few twists. Use two napkins in contrasting colors, a green one on the bottom and a red one on top, folded together. You will get a two tone tree. Add a small cinnamon stick as a trunk by sliding it into the bottom fold. Tuck a sprig of rosemary into the layers
#DIY #Christmas #NapkinFolding #Tablescape #HolidayDecor